I have just noticed that when using the XMLSerializer to write TimeSpan data to an XML output does not work - the public element is always written but is always blank!
Microsoft acknowledge the issue here
https://connect.microsoft.com/VisualStudio/feedback/ViewFeedback.aspx?FeedbackID=94492
Fortunately as always with these things not all is lost - and thanks to the web I have found a number of solutions...
http://stackoverflow.com/questions/637933/net-how-to-serialize-a-timespan-to-xml
http://lucaspirot.blogspot.com/2009/04/xml-serialization-and-timespan-bug.html
You could of course take on the serialisation by hand and format the entire object but this seems like hard work to me! Of course if your class has a large number of TimeSpan properties it may be worth the effort...
The two options best described by the two articles linked above both require a new property or public variable.
The first an I think most simple just requires a new property of type long which you now store your TimeSpan.Ticks value within it. Where in the example below StartTime was the original TimeSpan property - You can of course exclude the original TimeSpan property from the serialisation using the [XmlIgnore] attribute prior to the property.
[XmlElement("StartTimeTicks")]
[Browsable(false), EditorBrowsable(EditorBrowsableState.Never)]
public long StartTimeTicks
{
get { return StartTime.Ticks; }
set { StartTime = new TimeSpan(value);}
}
The alternative to the this approach is to just add a public long variable, again to hold the TimeSpan ticks value. Rather than using the property setter and getters - which for this scenario I prefer, you can set up two new methods descorated with the [OnSerializing] and [OnDeserializing] attributes. So the serialisation method you assign the TimeSpan.Ticks value to the variable and the deserialisation method updates your actual TimeSpan property based on the ticks value deserialised.
Personally, whilst the later method works just as well it seems like a lot more work - of course now I think about it, if you have multiple TimeSpan properties that need to be managed you could use the latter method to centralise all of the logic in two methods rather than multiple getters and setters. Your call, I hope this may of helped!!
Monday, 25 May 2009
Thursday, 14 May 2009
How do you stop a Virtual PC from synchronising its date time with the host PC?
Ever wondered how you can stop a virtual PC image synchronising its date and time with the host machine? Sometimes when testing it’s handy to be able to test in an identical environment each time – so if the date has moved on a few days tests that once passed no longer work or at least behave differently.
There is a way though!
Find your most beloved XML editor, or even notepad will do (just be extra careful when editing in notepad you don’t make any errors) I used XMLNotepad.
You can get XML notepad from here:
http://www.microsoft.com/downloads/details.aspx?familyid=72d6aa49-787d-4118-ba5f-4f30fe913628&displaylang=en
Open up your Virtual PC definition file – the .vmc file.
Scroll down and find <integration><microsoft><components>
Now you may or may not have this, but this is the key – under the <components>node you need to have – you may have had this element but it will likely be set to true.
<host_time_sync>
<enabled type="”boolean”">false</enabled>
</host_time_sync>
Save the vmc and reboot and you should be away! If you alter the virtual machine date/time and then commit the changes you should find once you reboot that the date and time have not altered since the commit changes.
Beware! I did read on here http://mcpmag.com/columns/article.asp?editorialsid=1649 that if you were to reboot the virtual PC without commiting the machine changes it will in fact resync the date/time again. So just in case!
Wednesday, 13 May 2009
How do I resize a Virtual PC .vhd file?
Ok so you have setup virtual PC 2007 intially with loads of room for your OS and applications but later discover your close to running out of space! The good news is, with a bit of work, you can actually expand the space you have available.
First you need a copy of VHDResizer:
Join the community first here:http://vmtoolkit.com/user/CreateUser.aspx?ReturnUrl=/default.aspx
The VHDResizer can be downloaded here : http://vmtoolkit.com/files/folders/converters/entry87.aspx
There are a few posts on here that suggest the resize does not work – I have found it to work a treat but have found you need to resize the partition of the drive that has been resized. I describe how to do this in another post to follow ( How do I resize a Virtual PC 2007 drive? Even after I have used Resizer the partition size is unchanged... ):
Here’s the easy bit, once you have installed the resizer, just run and select the drive you want to resize:

Simply select the drive you want to resize and open it:
Choose a destination file for the resized version to be saved to, select the type and size of the destination, click resize and you are away! Obviously depending on the size of files involved this can take a while.
Once done you can connect up your new resized drive as the primary drive of your virtual machine. Give it a test. Don’t for the moment get rid of your original file – it’s obviously good for backup and you may well need it in a moment for another post....
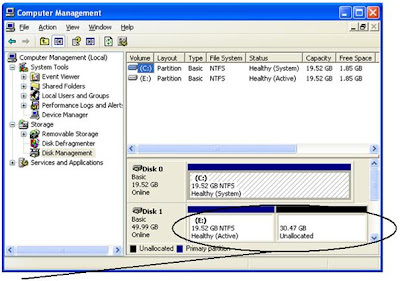
When you boot up using the resized file have a look at the C drive size, has it changed? If not, double check using the disk management snap in:
Click on the Start Button, and select
Control Panel (assumes you are in classic view), and then select Administrative Tools followed by Computer Management. Within the Computer Management snap-in select the Disk Management item under storage. As below:

If you find this situation and your primary drive is now resized in total but the primary partition remains unchanged. So in the image the primary partition is 19.5 gig yet there is 30 gig unallocated – have a read of my other post How do I resize a Virtual PC 2007 drive? Even after I have used Resizer the partition size is unchanged... and you then should be back and running!
Monday, 11 May 2009
How do I resize a Virtual PC 2007 drive? Even after I have used Resizer the partition size is unchanged...
Using Virtual PC 2007 I found that I had created the OS primary drive with too little space. I had originally thought that I had allocated loads of room until of course inevitably the time comes and you can’t believe the bytes remaining! Fear not, you can get around this of course as long as you have enough space on the machine you are working on. Firstly, if you haven’t done so already have a read of the this post: using resizer to increase your vhd files. Once you have done that return here for a few remaining steps:

Notice that the VHD resizer has done a fine job resizing the disk as a whole but the original partition within in the disk is the same size. The next few steps will readdress this making the partition match the size of the disk.
Check the name of the extended disk name – most likely to be disk 1 as shown here
Start a Command Prompt – if you like keyboard shortcuts you can use the Windows Key + R to open the ‘Run’ dialog and then type cmd and hit enter...
From within the running Command Prompt enter the command DISKPART
To review the drives again type LIST DISK followed by the enter key
Again disk 1 is visible, to work with this disk use the SELECT command as below:
SELECT DISK 1

Now the disk that we want to extend the partition for is selected we can now view the disk in detail using DETAIL DISK
Based on the disk details now select the volume using SELECT, so SELECT VOLUME 2 in the example:
Here are some virtual PC links on the Microsoft site if you want to give this great bit of software a try
Virtual PC home page - http://www.microsoft.com/windows/virtual-pc/default.aspx
Virtual PC 2007 download -http://www.microsoft.com/downloads/details.aspx?FamilyId=04D26402-3199-48A3-AFA2-2DC0B40A73B6&displaylang=en
Virtual PC 2007 SP1 download-http://www.microsoft.com/downloads/details.aspx?familyid=28C97D22-6EB8-4A09-A7F7-F6C7A1F000B5&displaylang=en
If you already have Virtual PC 2007 running and you have a disk that you want to increase in size here is the link to the VHDResizer : http://vmtoolkit.com/files/folders/converters/entry87.aspx
Right, you have a newly resized vhd file but if you boot a virtual machine from the link you still find the virtual machine declares the drive size is unchanged?
You kept the original vhd file before resizing, right? Ok, before restarting Virtual PC again, go to the setup screen of the VPC and make your old vhd file the primary drive and then the newly resized drive hard as drive two (Open the Virtual PC console, click on the settings button of the PC you want to change and select the vhd drives. Once the drives are selected, click OK to accept the changes and then start the virtual PC as normal)

Once your machine has started let’s review the drives configured on the machine:
Click on the Start Button, and select
Control Panel (assumes you are in classic view), and then select Administrative Tools followed by Computer Management. Within the Computer Management snap-in select the Disk Management item under storage. As below:
Click on the Start Button, and select
Control Panel (assumes you are in classic view), and then select Administrative Tools followed by Computer Management. Within the Computer Management snap-in select the Disk Management item under storage. As below:

Notice that the VHD resizer has done a fine job resizing the disk as a whole but the original partition within in the disk is the same size. The next few steps will readdress this making the partition match the size of the disk.
Check the name of the extended disk name – most likely to be disk 1 as shown here
Start a Command Prompt – if you like keyboard shortcuts you can use the Windows Key + R to open the ‘Run’ dialog and then type cmd and hit enter...
From within the running Command Prompt enter the command DISKPART
To review the drives again type LIST DISK followed by the enter key
Again disk 1 is visible, to work with this disk use the SELECT command as below:
SELECT DISK 1

Now the disk that we want to extend the partition for is selected we can now view the disk in detail using DETAIL DISK
Based on the disk details now select the volume using SELECT

Finally, and very simply, to get the originally smaller partition to utilise all the space now available type EXTEND
And that’s it – if you left the Computer Management/Disk Management window open you will immediately have seen the drive change:
The E drive in this example is now one partition of 50 gig space. Close your machine session and commit the changes and then all that remains is to return to your virtual machine setup and make your new extended hard drive the master drive. You can then move/delete/backup the original vhd file (as you so wish!)
Subscribe to:
Posts (Atom)