This is a neat trick that I was unaware of until the other day. Have you Fiddler to look at your web traffic? Fantastic tool right? You can get it here http://www.fiddler2.com/fiddler2/ it is free debugging proxy.
Anyhows... I wanted to test some local web development but to my frustration initially it like you cannot debug this local traffic. You can though, simply use http://localhost./ instead of http://localhost/ in your addressing and bingo... cool huh?
Wednesday, 16 December 2009
Sunday, 13 December 2009
How do you get Firefox to show HTML LI list items like IE?
Earlier this week I had a web page that would not render quite properly under firefox, it had a list of bullet points that were in fact placed inside a TD cell and it just looked like the bullets were not centered in the cell.
Embarassingly enough I cannot remember the precise code to reproduce the layout here, which if I get some time will give you a code sample so you can see what happened. I initially though I could solve the problem using appropriate padding and margins for just Firefox but I'm pleased to say rather than using that hack I spotted the real problem.
For whatever reason, and I don't know if IE or Firefox is at fault I noticed that the IE list items had a property of list-item-position set to inside - where as Firefox was set to outside. Changing my firefox stylesheet to use list-item-position:inside solved the problem!
IE8 float issue with ASP .Net User Control
I had a new float issue appear the other day and whilst easy to solve was a bit of a pain to find! It was unique to IE8 in that IE 6, 7 and Firefox behaved whilst 8 didn't. I had two floats on a two column page and the left float would appear underneath the main content in IE8.
I discovered, if you happen to have a similar problem, that one of the user controls that was being processed on this page was wrapped within <FORM> tags - yet it wasn't a form to be processed, it didn't have an action - the parent master page itself had form the processing origanised. Once the FORM tags were removed from the user control IE8 then behaved itself. Hope this helps if you come across this problem!
I discovered, if you happen to have a similar problem, that one of the user controls that was being processed on this page was wrapped within <FORM> tags - yet it wasn't a form to be processed, it didn't have an action - the parent master page itself had form the processing origanised. Once the FORM tags were removed from the user control IE8 then behaved itself. Hope this helps if you come across this problem!
How do you write HTML to appear in your blog?
Now and again, especially if writing about code you will want to display an example of source code in your blog, and if you are writing about HTML you may want to display some tags. If you are using Blogger, or mny other blogging tools it is likely instead of showing you HTML example the blog software will process the tags and render the output rather than displaying the code. How do you get round this?
Two things, first and most simply for any source code use the <code> tags.
Second, more especially for HTML use the following < for < less-than symbols and use > for all > greater than symbols. This will allow your source to appear on the page and not get processed:
<table>
<tbody>
etc etc...
Two things, first and most simply for any source code use the <code> tags.
function foobar(){ return true;}Second, more especially for HTML use the following < for < less-than symbols and use > for all > greater than symbols. This will allow your source to appear on the page and not get processed:
<table>
<tbody>
etc etc...
How do you get a HTML table TD cell to wrap consistently?
I have just had some fun working with a HTML table. I just a table with five cells each of which I had initially set widths on each TD element. When the data for each cell was less than the predefined widths everything displays fine but as soon as the data exceeds the width I found the cell sometimes wrapped but usually kept the table expanding (The data I was trying to get to wrap was a URL - so just a continuous string without spaces) I think had the data included spaces the mishaped table would not have been so bad.
The solution I found was to embed a DIV within each TD that I wanted tied to a specific width - and within the DIV style or CLASS set a width explicitly. This found kept the table aligned!
The solution I found was to embed a DIV within each TD that I wanted tied to a specific width - and within the DIV style or CLASS set a width explicitly. This found kept the table aligned!
<table>
<tbody>
<tr>
<td width="100px">
</td>
<td width="200px">
   <div>class="widthclass" OR style="width:200px">
        data....
   </div>
</td>
</tr>
</tbody>
</table>
How do you get CPanel to create an email account that works with Outlook?
I have been using Cpanel on a number of hosts for a while now and had never had any problems. I have a domain, want an email address, just create a new account and set a password. CPanel then lists the details that need to connect via an email client and you are away.
Although I have noticed the details CPanel give you back are slightly incorrect, such as the user name appearing as name+domain rather than name@domain - but easy to rectify none the less.
Unfortunately the last account I added didn't connect from the client - it worked from the webmal link but not my outlook client. Annoying very annoying!
The solution, in this case was to reset my password making sure that all the characters used were lower case! What a pain that was, especially since you expecially when I expected the issue to be related to server names, ports or that kind of stuff!
If you are having problems give this a try....
Monday, 23 November 2009
Hou do you get a hyperlink to run some code instead of linking to another location?
I was just working on a web page today and the design was such that there were multiple hyperlinks, two were to other pages but the third was a function to validate a portion of the current page. My problem was, how do I run some javascript instead of setting the anchor to another page?
I first tried to use an onclick handler without a url - now this did work but as a side effect of not having a url link the hyper link was not drawn showing the underline and coloring. So I added a url but of course the onclick functioned correctly but the page then navigated away.
Finally, and successfully, if you specify javascript:functionname() in the anchor href- where functionname() is defined in the script somewhere in your html document it works a charm. Additionally, after the javascript: you actually add multiple commands as long as they are semi-colon delimited. Obviously this can get a bit messy so better to have all the code in the function but the option is there!
Monday, 9 November 2009
How do you get rid of "Failed to execute request because the App-Domain could not be created. Error: 0x80131902" event log error?
Failed to execute request because the App-Domain could not be created. Error: 0x80131902
Once I had got rid of the 403 forbidden error in the previous post I thought it was all systems go again, alas no! : ( lol.
No, I started to get a 'system was unable to deliver your page' or something similar which unfortunately I had not taken a note of, but the error message in the browser stated to look at the event log for complete details. The message I found was listed above - so what the heck do you need to do to get rid of this?
I should have realised but the problem probably stemmed form the fact I had only just installed IIS, and the .net framework was installed sometime before it. You need to re register the .net framework under IIS using:
Stop your IIS, either control panel or "net stop w3svc" via command prompt
(Use the Visual Studio command prompt to get the necessary paths setup to run the aspnet_regiis tool)
Use aspnet_regiis -ua - which will uninstall all the instances of .NET against your IIS
Then use aspnet_regiis -i to install the services again.
Start your IIS again, control panel or "net start w3svc"
Hopefully you are now away again....
How you get rid of the 403 forbidden error when trying to view your web page through Visual Studio?
How you get rid of the 403 forbidden error when trying to view your web page through Visual Studio?
I was trying to view a new website I had downloaded the source for at work and then view the page through Visual Studio browse - of course trying to the page direcly via localhost did give exactly the same problem but why?
Well, although I did come across some other problems to follow in another post, check your IIS settings... Load up IIS via the control panel admin tools, navigate to the default web site - right click and select properties. Now, via the popup that appears select the documents tab - in that list check that default.aspx and index.aspx are there - are they? So initially, in a string of events, I simply didn't have the .net default pages set....
Thursday, 8 October 2009
How and why do you url encode and decode?
Well less of me and more of a guy called Brian Wilson. I had a file that I wanted to url encode - since the filename I had used was littered with spaces and at the time couldn't precisely remember what to change!
Anyway to cut a long story short if you want to know the whys and hows or url encoding go visit Brian's page - http://www.blooberry.com/indexdot/html/topics/urlencoding.htm
The cool thing is he has placed some code on the site so you can actually encode your unencoded url! Very useful, giving you the details of the JavaScript functions String.charCodeAt and String.fromCharCode.
Thursday, 1 October 2009
how do you get that Don't cha t-shirt from the KitKat advert?
I don't know about you but I love that new kitkat advert with the bloke dancing/point to the lyrics of the pussycat dolls song, don't cha, with the lyrics printed on the tshirt! lol. I was going to say how cool but clearly I am geek LOL. To my joy though I found I could too wear the TShirt and mime to the advert.... - http://www.cafepress.co.uk/DontChaWish Has anyone found a link to the video online? I can't find it anywhere - I just have to keep the TV on : ( lol
Wednesday, 16 September 2009
How do you stop QCODO load blank pages?
I've just been doing work on a PHP web project that uses QCODO. So my client could see changes I have made I setup an installation on a server of mine. So I used the latest XAMPP to get a web server, db and php running. Secured the default security holes using the security page and then copied the source to the web root ht docs folder.
Now for a number of hours, and much hair pulling (and believe me there isn't much hair there to begin with!) Every time I tried to load a page that utilised QCODO it just loaded a blank HTML page. Not very helpful!
Firstly, I found that you can get some more useful debug info (well I say useful, let's just say some debug info) when you comment out the ob_start('__ob_callback'); line (just prefix it with //) in the qcodo.inc.php file. You can find this file under your qcodo installation folder in includes/qcodo/_core. Rerun you pages and you now get some errors relating to a date function. Thanks to some other bloggers and forum writers out there this seems purely down to the version of PHP you are running against. Of course when I set my server up I was using the latest version of XAMPP which was budled with PHP 5.3 on my devbox I used XAMPP 1.7.0 which was using PHP 5.2.8 - and this version worked.
So for me the solution at the moment was to install a compatible version of PHP. It would appear QCODO is not currently worked on, and there is another project about called QCUBED which has taken on this work - but have yet to try. I will write anoter entry on here if I ever get the time!!
How do you get phpmyadmin to work after you have changed or given mysql a password?
I have recently install XAMPP on my machine which made installing Apache, MySQL and PHP a doddle. I have to confess I wouldn't of had a clue how to install these components individually and whilst I'm sure I could have located and installed them, XAMPP makes this damn easy!
Whilst XAMPP is a great tool it is for development purposes by default and openly warns you that there are some big security holes left open on installation - so don't use, certainly out of the box, as a production environment.
One of the open features of the installation is the MySQL is installed with a blank root password. Using the latest version of XAMPP there is a fantastic web page found using the security link on the \localhost\xamp page that allows you to secure folders and set a mysql root password. On an older version this assistant is not available, so me being me I setup a root password for mySQL just for neatness on my development box. Alas, after doing so the phpmyadmin page no longer longer loads because it cannot connect to the database - doh. Ok, so all you need to do to solve this is locate the config.inc.php file in the phpmyadmin folder under the xampp install folder and open the file up in a text editor. Have a look for ['Servers'][$i]['user'] = 'root' and there will also be a statement that follows that is for ['password'] = '' obviously from here you can update the password and reload your admin.
I will add, and I have to admit being unable to remember at this second, you may need to restart Apache after making this change. I would make the change, retry the page - if you retry the page and you are sure you have entered the correct credentials and it still fails then give it a restart!
How do you get past "Windows cannot access the specified device, path, or file. You may not have the appropriate permissions to access the item."?
I had copied a file to my test server Windows 2003 and tried to run it and repeatedly got "Windows cannot access the specified device, path, or file. You may not have the appropriate permissions to access the item.". I tried moving it to different locations but still no, it would not budge. I was actually connected as Administrator so permisissions should not have been a problem.
The solution,,, all I needed to do in this case was look at the file properties and noticed a security section on the general tab. Windows had identified the file coming from another machine and had blocked access to it - and of assuming you happy with the file's source and safety there is an 'Unblock' button. Click this and you are back in business!!
The solution,,, all I needed to do in this case was look at the file properties and noticed a security section on the general tab. Windows had identified the file coming from another machine and had blocked access to it - and of assuming you happy with the file's source and safety there is an 'Unblock' button. Click this and you are back in business!!
Wednesday, 26 August 2009
How to create an HTML signature in Outlook?
I have just been trying to add a banner to an HTML email. Initially I thought I would create an HTML page and then tried to link this using the Outlook signature creator pointing to the HTML file... I tried this and nothing appeared! So I can only assume my HTML which I purposely kept really simple and used tables which I had previously read would make an email more likely to work but alas not!
But, thanks to another blogger out there a fantiastically simply yet effective solution to this is to open your HTML page that displays page as you want. Then highlight the page in your browser and copy. In the Outlook signature admin, just add a new signature for editing and then paste what you have just copied into the editor and bingo, the HTML I was slaving to work is just there!!
If still not quite to your satifsfaction you can edit the resulting HTML by going to C:\Documents and Settings\\Application Data\Microsoft\Signatures and in there you will find your signature file as an .htm So once you are roughly happy with the appearance in the signature editor you still go back to the htm file and now tweak as needed. So I found this a really easy way to do it!
But, thanks to another blogger out there a fantiastically simply yet effective solution to this is to open your HTML page that displays page as you want. Then highlight the page in your browser and copy. In the Outlook signature admin, just add a new signature for editing and then paste what you have just copied into the editor and bingo, the HTML I was slaving to work is just there!!
If still not quite to your satifsfaction you can edit the resulting HTML by going to C:\Documents and Settings\
Friday, 21 August 2009
How do you populate a new email from an HTML onclick code?
I have used HTML links before with the href set to mailto:address@blah.com, which always work a treat. Today though needed the same functionality as a straightforward mailto link but via an onclick event of a DIV I'm using as a button.
Not difficult once you know how, and I also found out a couple of neat new tricks for populating the mail client with values.
All the onclick code requires is:
onclick="self.location = 'mailto:help@selfhelpsupemarket.com'"
Not difficult once you know how, and I also found out a couple of neat new tricks for populating the mail client with values.
All the onclick code requires is:
onclick="self.location = 'mailto:help@selfhelpsupemarket.com'"
Simply append to the mailto: email address a query string using cc, bcc, subject and or body fields to pre-populate the client mail message with the appropriate fields filled. All the fields are optional so you only need to use the fields appropriate to your task. All fields and values need to be separated with ampersand.
A couple of examples:
mailto:steve@t.com?subject=hello from website&cc=info@test.com
So create a new email to be sent to steve@t.com, cc'd to info@t.com with a subject of hello from website.
mailto:steve@t.com?subject=hello from website&body=Dear Steve,
This one will create a new message again to steve@t.com with the same subject but the message body is started with Dear Steve.
How do you subscript or superscript html text without affecting the paragraph line spacing?
Bit of a long title today but a simple request!
I have only one character in some text that I would like to subscript. Initially I used html 'sub' element which I can't deny does work but if you have multiple lines of text the line that displays the subscript will end up having a greater line height than the others which in my pedantic world caused nightmares!
Let's see if I can demonstrate here:
line1 with a subscript number 1 after line
some other lines follow this one without any super or sub script features.
some other lines follow this one without any super or sub script features.
There is another way though which now allows me to sleep at night : ) hurrah. Simply use a span around your subscript item (or super) and set it style to:
position: relative;top: 0.3em;
from this you can obviously change the top value to choose the character position and in fact make it superscript. Here is the updated version below:
line1 with a subscript number 1 after line
and some superscript using a top of -0.3em easy.
some other lines follow this one without any super or sub script features.
better?!
Thursday, 20 August 2009
How do you change the size of the rectangle margue in Photoshop Elements?
I have just been working on some images in the Photoshop Elements again and it has always annoyed me that when I use the rectangle selection tool, that once I let go of the mouse I cannot change its size, only move it. I doubted you couldn't I just didn't know how - a big difference!
I have discovered once you have let go of the mouse while using the selection tool (I noticed this works for the crop tool too - and no doubt others) you really cannot resize the selection BUT if you keep the mouse button down - and then press and hold the spacebar, when you do this the selection moves, let go of the spacebar and the selection resizes again. Do all of this while keeping the mouse button down.
I used to find myself selecting part of the screen and getting a rough size right but found I was a few pixels out and then would try to resize the selection - and this really doesn't work. So using the technique above allows you to get the surrounding size about right, find you are a few pixels out and then use the spacebar move option to nudge those pixels out and then release the bar and resize the image back again. Neat!
Whilst not difficult it did take a few goes to perfect the technique since my mind was still thinking draw the shape and then, after a coffee perhaps, go back and resize!!
Tuesday, 18 August 2009
How do you change the mouse cursor using CSS?
An easy one for all the HTML and CSS gurus out there, but up until today I wasn't even aware you could change the cursor on an HTML page using CSS.
So earlier on, I have a number of DIVs that are in effect some large buttons which I have added some hover code to show highlighting etc, which of course led me to ideally need to change the cursor so the user knows clicking will be applicable. All you need is to set the cursor style to pointer - in the case a hand for links e.g
.mylink {cursor:pointer}
Now of course there are a load of other cursor values - auto, crosshair, default, e-resize, help, move, n-resize, ne-resize, nw-resize, pointer, s-resize, se-resize, sw-resize, text, wait, w-resize. Which most are fairly self explanatary I think but at least you can change them now!
Finally, and I havn't tried this but you can even go so far as providing yor own cursors! You do this specifying a url in the CSS cursor:url('path to cursor'). I haven't tried this, and may not need to, but if I do I will add new a post!!
How do you get an image to appear in an DIV, paths?
This is a silly one. I have used without a problem the CSS background-image: statement including backgrounds for DIVs, until today that is....
I have an html document in the root folder, along with two sub folders: a resorces folder for my stylesheet style.css and an images folder for all the images. Before the lightbulb switched on I referenced my images as background-image:url('images/image_name.jpg') BUT to my frustration for a good half an hour was the images did not appear - now I was trying to use a background for a DIV but it could have been any images.
The light bulb moment - I feel daft for admitting to the problem but I have seen it before and still did not remember... so the issue is simply this - the path used is relative to the stylesheet loaded and NOT the HTML document as I imagined. So, I originally used '/images/imagename.jpg' which is relative to the html, and what I needed for it to work was actually a path like '../images/imagename.jpg' which is because the stylesheet is in a resources folder, so the path needs to be a parent folder above before navigating to the images folder.
Like I said a real simple one to solve, but when I was convinced in my mind the path should be relative to the root folder it took quite a bit of head bashing to get it fixed!
Saturday, 15 August 2009
How do you know what all the new office 2007 extensions are?
I have just been sent an Excel document with an .xlsm extension and wondered what the heck this meant. With a bit of a search this is a 2007 open XML format with macros enabled, so an xlsx document is without macros.
This microsoft link clears up the what and why of the new extensions here: http://office.microsoft.com/en-us/help/HA100069351033.aspx?pid=CH102457411033
On a similar note if you need to open said new formats in an earlier version of Office you can do by using this compatibility pack here - http://www.microsoft.com/downloads/details.aspx?displaylang=en&FamilyID=941b3470-3ae9-4aee-8f43-c6bb74cd1466 I have been using this with an Office 2003 installation and it does seem to work well. The only thing is there is a noticable time lag opening and saving the files - which based on the conversion work to bedone I guess this is no surprise.
Reading the above document, the Office 2007 release includes a feature to inspect a document for personal information. So within Excel if you load a document, click the Office button, selct prepare and then inspect document - it will then all you remove all personal references from the saved document, very neat. Have a look here for the complete details. http://office.microsoft.com/en-us/help/HA100375931033.aspx
Friday, 14 August 2009
How do you look at Outlook's autosuggest email addresses?
I was just typing in some email addresses and could see from the Outlook auto suggest list a number of email addresses that I would like to cut and paste into another application - which is easier said than done!
There is a file in \documents and settings\\application data\microsoft\outlook\outlook.nk2 - where is the user you are logged in with. You may just want to search for .nk2.
If you were to change machines you can now of course copy this file and your autosuggest list will be re-established. Which I thought was a neat trick to know - of course I would imagine you want to make sure you are using the same versions of Outlook.
Finally, I have found an application which is still in Beta but works pretty well none the less - ah except if you have Vista it does not seem to work! Download it here at www.nk2.info - now I found I had to download the full libraries since when trying to run the lastest version on its own it was unable to find some .ocx files.
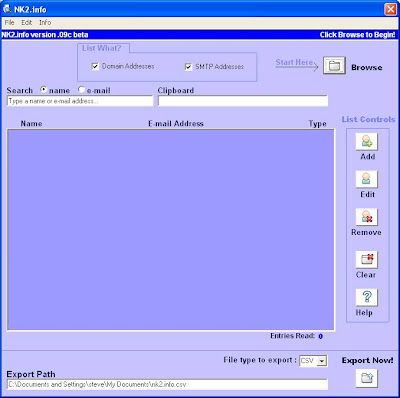
To start with just click on the browse button and it will suggest where to find the nk2 file - if this doesn't work, and I haven't had a problem just do a global search for a .nk2 file and based on the location found browse to it using the tool. When you select the file, and depending on the number of suggest entries you may have to wait a few seconds. You can now add/edit or remove items from your cache. Additionally, and this was the bit I wanted to use was the export feature - you can export to csv or tab delimited output file with all the email addresses.
I did find on a couple of machines the program crashes when you close it down but works a treat while running so far from the end of the world!
Mail on!
There is a file in \documents and settings\
If you were to change machines you can now of course copy this file and your autosuggest list will be re-established. Which I thought was a neat trick to know - of course I would imagine you want to make sure you are using the same versions of Outlook.
Finally, I have found an application which is still in Beta but works pretty well none the less - ah except if you have Vista it does not seem to work! Download it here at www.nk2.info - now I found I had to download the full libraries since when trying to run the lastest version on its own it was unable to find some .ocx files.

To start with just click on the browse button and it will suggest where to find the nk2 file - if this doesn't work, and I haven't had a problem just do a global search for a .nk2 file and based on the location found browse to it using the tool. When you select the file, and depending on the number of suggest entries you may have to wait a few seconds. You can now add/edit or remove items from your cache. Additionally, and this was the bit I wanted to use was the export feature - you can export to csv or tab delimited output file with all the email addresses.
I did find on a couple of machines the program crashes when you close it down but works a treat while running so far from the end of the world!
Mail on!
Monday, 10 August 2009
How do you change an Excel Row to a Column?
I can't believe how easy this actually is but until I knew I was left working out how to use formulas to do this, and you really don't need to. Initially, I was over the moon an quite proud having written a formula to do this but now I'm just red with embarassment - and as the KISS principal prevails!
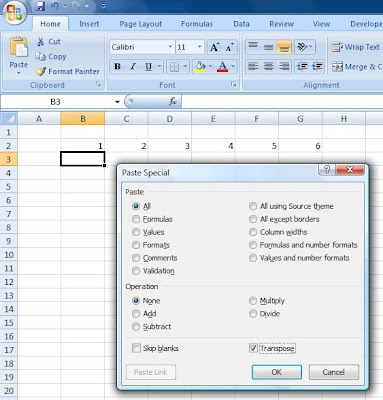
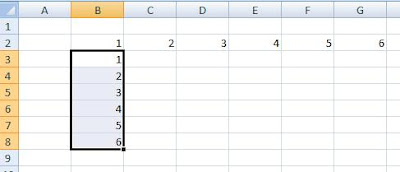
Ok, so you have a row of data that would now like to work with as column. Firstly, just select the row of data you wish to convert and edit->copy. Select the cell you want you new column of data to start and use Edit->Paste Special (Or if you are using 2007 just use the right click over the cells you are working with) and then click the transpose checkbox on. Press OK and you are away! Easy eh?!!
Ok, so you have a row of data that would now like to work with as column. Firstly, just select the row of data you wish to convert and edit->copy. Select the cell you want you new column of data to start and use Edit->Paste Special (Or if you are using 2007 just use the right click over the cells you are working with) and then click the transpose checkbox on. Press OK and you are away! Easy eh?!!

Thursday, 6 August 2009
How to switch on Joomla debugging... resolving problems
As I mentioned in my previous post I managed to get to a situation where every time I loaded the home page it loaded a 404 error. Now trying to search the web for a solution for a Joomla 404 error, as you can imagine results in a couple of pages!!
So I spotted by chance the debug option in Site->Global Configuration->System
Now if you switch the debug system on and apply changes you will notice all further interaction with Joomla will result in a load of debug information being displayed. All well and good! So now this information is showing I reloaded my home page and the resulting 404 error includes some debug information - hurrah!

So finally, armed with this new information I could see prior to the JError->raiseError() call, a call to JComponentHelper->renderComponent() which I then Googled to find precisely why my page wasn't loading!! I'm well aware the error was a really silly mistake (a missing default menu) but had I not found this option I could have been looking around for a solution for quite a while.
So I spotted by chance the debug option in Site->Global Configuration->System

Now if you switch the debug system on and apply changes you will notice all further interaction with Joomla will result in a load of debug information being displayed. All well and good! So now this information is showing I reloaded my home page and the resulting 404 error includes some debug information - hurrah!

So finally, armed with this new information I could see prior to the JError->raiseError() call, a call to JComponentHelper->renderComponent() which I then Googled to find precisely why my page wasn't loading!! I'm well aware the error was a really silly mistake (a missing default menu) but had I not found this option I could have been looking around for a solution for quite a while.
How do you get rid of 404 error when viewing Joomla home page?
I'm still learning Joomla at the moment and have been making a lot of changes just to see how everything fits togther. I have though now managed to get to a position where when I try to preview the site or load the default home page I get a 404 page not found error - arrrrgggghhh.
Interestingly all the problem is the fact I do not have a default menu! Have a look at your main menu and double-check that you have a default item. Reseting solved the problem. I have since tried to replicate the problem by creating a new menu, making it the default and then trying to deleting it - and then in theory leaving me without a default menu but Joomla caught this and wouldn't allow the deletion, so I'm not sure how this happened!
Initially I tried to search for a resolution by looking for 404 errors but of course this results in millions of messages. I'm just going to post another entry relating to debuging which assisted the solution much more quickly.
Wednesday, 5 August 2009
Using the Stroke Command in Adobe Photoshop Elements
I couldn't believe when using Elements I never seemed to be able to draw a shape and just have an outline appear. The shape drawn always loads with a fill - as usual with thanks to the interweb I found some solutions - solutions since I found another problem along the way!

Ok so I have a filled image here - to get rid of the fill click on the shape tool again, on the tool bar select the style drop down - from the drop down click on the little double right arrows at the top right of the window that opens, select visibility and then select hide - you should then see your shape appear as an outline - at this point the shape is literally hidden, so although you can see an outline if you were to save the image there would be nothing there.
The next step is to use the stroke tool to outline the shape. This is where I initially had a problem, every time I tried to use Edit->Stroke the Stroke item was disabled/greyed out.
So.. add a new layer - you now have a shape layer and a new layer. Select the new layer, and then while holding down the control key left click on the shape thumbnail layer.

You should see your shape outline highlighted for selection. It is now possible to use the edit->stroke command.

From here you select the width of the new outline you want, color, the location of the outline and blending. Press OK to go. You now have an outline on the new layer you added. You can now infact delete the shape layer and continue to work with your outline that resides on the new layer added.

How do you add items to the Joomla "Pill" menu?
I have just started playing with Joomla and as part of reading a new book on the subject wanted to add some menu items to the pill menu at the top of the screen. In truth, I had probably deleted some key elements while mucking around with the Joomla administration but none the less I had arrived at a situation where I couldn't add any items to this menu - ooops.
I have now solved it and as always with these things, it pretty straightforward:
Add a new Menu via the Menus-> Menu Manager. Add your names and description, and the key thing here is to fill in the module title with mod_mainmenu.
Now once done go to Extentions->Module Manager and edit the mod_mainmenu module. The key thing now is to change the position to 'user3'. Save changes and then start adding menu items to this new menu and you are away!
I have now solved it and as always with these things, it pretty straightforward:
Add a new Menu via the Menus-> Menu Manager. Add your names and description, and the key thing here is to fill in the module title with mod_mainmenu.

Now once done go to Extentions->Module Manager and edit the mod_mainmenu module. The key thing now is to change the position to 'user3'. Save changes and then start adding menu items to this new menu and you are away!

Friday, 31 July 2009
How do you get Outlook to download your hotmail/live mail emails and calendars?
I just wanted to download my live.co.uk emails in Outlook. Now I had managed to do this years ago using the Hotmail HTTP account type and thought easy, just repeat that account type of old and I would be away. You know guessed it, nope that didn't work. I did however find a solution....
Go to Microsoft and get the Outlook Connector - Outlook Connector
Now once this is installed it will automatically start up Outlook and request the account details that which to add:

So quite simply enter your email account, password and the name you wish to appear on your emails and bingo! Well nearly, whilst this now works on my machine I found that I had to close down Outlook a couple of time prior to the email working. Once over that hurdle it now works a treat!
Thursday, 30 July 2009
How to clear the recent documents list in Word 2007
Just playing with Word 2007. Whilst I have to say I do like the new look and feel of the ribbon interfaces I still find myself looking for menus that don't exist, and occasionally not being able to do what I want! Undoubtedly the functionality will be there just not alway obviously I find.
Anyway, a minor be never the less annoying at the time feature I couldn't find was how can I clear the recent documents list. I now know how... Simply, click on the Office button, click on the Word Options button, select the Advanced button, scroll down to the Display section and set the number of Recent Documents to zero and press OK. Now if you repeat the process and then set the display number back up to what it was you will find the list is cleared and ready to be repopulated.
Anyway, a minor be never the less annoying at the time feature I couldn't find was how can I clear the recent documents list. I now know how... Simply, click on the Office button, click on the Word Options button, select the Advanced button, scroll down to the Display section and set the number of Recent Documents to zero and press OK. Now if you repeat the process and then set the display number back up to what it was you will find the list is cleared and ready to be repopulated.
Wednesday, 29 July 2009
How to get something for nothing...
I have always been into self-help and personal development - mostly via piles of books or thanks to many people out there on the interweb. So recently my partner and I went to a T Harv Eker Millionaire Mindset seminar - which was utterly fantastic, as a Brit the clapping, high fiving and generally being social was difficult to begin with but I have to say I did learn a hell of a lot and improved as a person as well - so you can't knock it at all.
So swayed by the new energy found by this first seminar I booked to see Christopher Howard's Breakthrough to Success seminar, again in London. Again, what a great three days. While Harv was a very much a money focused event - looking at how to create and keep money. The Chris Howard event was less focused on the financial gain - which following all the training will still undoubtedly happen but more focus was given to the traits of successful people. He also used affirmations, NLP and hypnotic suggestions which for me were fantastic.
Now if you are a follower of either of these guys, or like me you are a self development addict. Chris Howard is running his next Breakthrough to Success in Dublin Ireland in September - 11 - 13th 2009. Also, if you visit www.selfhelpsupermarket.co.uk you can now get a free complimentary pair of tickets to the event - so if you are about then I recommend it.
Of course, I said get something for nothing - which with the complimentary tickets you are getting a lot but you need to put in a lot to get a lot out of it. Firstly, it runs Friday to Sunday - you need to take the Friday off and be happy to invest in your weekend. Also, it starts early and finishes late - roughly 8 in the morning to 11 at night - so this isn't for part timers. The T Harv seminar was similar and for me the commitment you get from Harv and Chris just make the training so much more attractive and worthwhile.
How do you get a DIV to centre in Internet Explorer?
I have had the problem a number of times and I can never for the life of me remember the solution! So I hope writing it up here will allow it to sink into to my brain, or at least I can come here to find out!
Ok so you have HTML DIV that you would like to be presented in the centre of your browser. First off you need to set the width and set the left and right margins to auto at the DIV level:
width:800px;margin-left:auto;margin-right:auto;
Then, to get IE to play ball you need to include a text-align:center style to your HTML body so I''ve just added the following to my stylesheet:
body {text-align:center}
Hope this helps!
Thursday, 25 June 2009
How do I get some images and icons when using Visual Studio?
Visual Studio 2008 comes bundled with a large number of icons, bmps and pngs that can come in extremely useful if youare putting together a Winforms application. I have used this before with 2005 but am never able to remember it!
So to get these files just go to c:\program files\microsoft visual studio 9.0\common7\VS2008ImageLibrary\1033 where you will find a zip with all the files available! As for VS2005 and earlier possibly - I would try looking in similarly named but versioned folders.
Let's see if typing this will help me remember!
Friday, 19 June 2009
How do you reference other workbooks directly in Excel?
I use Excel a lot and love it but there you go I'm pretty sad!! When I do use it I do so pretty much exclusively with one workbook and multiple sheets. Now using Excel today I wanted to use an external sheet and perform a VLOOKUP, nothing revolutionary I know.
The thing was I wanted to type my formula in by hand, and the truth was I couldn't - it was a dreadful feeling!! lol. Ok, so I used the parameter editor to get some help. you know the little fx button next to the formula bar and learnt a few interesting facts:
Ok so initially I had the spreadsheet I wanted to link to open, I clicked the tab and range for the VLOOKUP and hey presto, thanks Excel its all fine and dandy. When you look at this formula, while the linked spreadsheet is open, you will notice that the reference is along the lines of [workbook.xls]tabname!cell:range. What is interesting to note if you then close you linked spreadsheet, Excel modifies the formula to 'drive:\path\of\workbook\[workbook.xls]tabname'!cell:range - which in my mind would be what I needed to type had I manually created the formula - and my goal might I add!
I did want to take this a little further and dynamically create the path since I knew I would always have the lookup source in the same folder. So I was going to use CELL("filename") strip off the filename and concatenate this path to my workbook reference. This didn't work, so I thought I would use the INDIRECT() function but googling more other people mentioned this does not work with closed workbooks. So I failed here, and since some of the work I am doing is using Excel automation I am instead passing this full path to the .Formula property and it does then work. Apparently, and I haven't investigated this, there is an add on called something like indirect.ext which will allow indirect to work with closed workbooks... I will try to have another look soon!
Tuesday, 16 June 2009
How do you stop Excel sometime missing commas when exporting to CSV?
I have just been trying to export my spread data to a CSV. The last column of the data I have been working with does not always have a value and as a result when exporting to CSV I noticed that some rows end with a comma (the expected result when the value is blank) and others don't - even when the last value is blank... Very strange!
Thanks to some other posts out there on the web to get around this problem you need to populate the last column with a value - be it a space, a tab etc Once it contains a value the comma is then consistently applied to the csv output file - phew!
Here is a post on the Microsoft regarding this "feature" - Mircosoft support article
Sunday, 7 June 2009
How do you combine a couple or more PDF files?
I just happened to need to scan and send back a non-disclosure document which I then wanted to convert to a single PDF file. Now I was using Adobe photoelements to scan the documents in and using the Save As option it is easy to save the document as a PDF. The problem that arises is I wanted one PDF instead of the two I was currently getting.
Along comes pdftk (PDF toolkit) to the rescue - see Download PDF Toolkit
This a command line tool which does a lot more than just allow the concatenation of PDF but for todays blog I just wanted to pass on how I merged two source pdfs into one:
Ok, so you need to extract the pdftk.exe from the zip file downloaded from the link above. Open up a command prompt (oh yes and I am assuming you are running this on Windows). Navigate to the folder with the pdftk.exe in it.
Now in my example I had two pdf files - non_disclosure_agreement_p1.pdf and non_disclosure_agreement_p2.pdf both situated in the root of the e drive. I have just unzipped the pdftk file into my documents folder - so c:\documents and settings\steve\my documents - so my goal was to get a merged pdf in this same my document folder. Like so:
pdftk e\non_disclosure_agreement_p1.pdf e:\non_disclosure_agreement_p2.pdf cat output non_disclosure_agreement.pdf
this does the job! the cat command concatenates the two inputs, which could have been many more files. The output statement then declares the location and filename of the output file. In this case I just supplied a filename and therefore created the new file in the my documents folder. Now as you can see this was a really simple use of the tool kit.
If you run pdftk --help you get a help listing.
I have copied and pasted the help text here - which you can review the other features available:
<--HELP LISTING-->
pdftk 1.41 a Handy Tool for Manipulating PDF Documents
Copyright (C) 2003-06, Sid Steward - Please Visit: www.pdftk.com
This is free software; see the source code for copying conditions. There is
NO warranty, not even for MERCHANTABILITY or FITNESS FOR A PARTICULAR PURPOSE.
SYNOPSIS
pdftk
[input_pw ]
[ ]
[output
[encrypt_40bit | encrypt_128bit]
[allow]
[owner_pw]
[user_pw]
[flatten] [compress | uncompress]
[keep_first_id | keep_final_id] [drop_xfa]
[verbose] [dont_ask | do_ask]
Where:
may be empty, or:
[cat | attach_files | unpack_files | burst |
fill_form | background | stamp | generate_fdf
dump_data | dump_data_fields | update_info]
For Complete Help: pdftk --help
DESCRIPTION
If PDF is electronic paper, then pdftk is an electronic staple-remover,
hole-punch, binder, secret-decoder-ring, and X-Ray-glasses. Pdftk is a
simple tool for doing everyday things with PDF documents. Use it to:
* Merge PDF Documents
* Split PDF Pages into a New Document
* Rotate PDF Documents or Pages
* Decrypt Input as Necessary (Password Required)
* Encrypt Output as Desired
* Fill PDF Forms with X/FDF Data and/or Flatten Forms
* Generate FDF Data Stencil from PDF Forms
* Apply a Background Watermark or a Foreground Stamp
* Report PDF Metrics such as Metadata and Bookmarks
* Update PDF Metadata
* Attach Files to PDF Pages or the PDF Document
* Unpack PDF Attachments
* Burst a PDF Document into Single Pages
* Uncompress and Re-Compress Page Streams
* Repair Corrupted PDF (Where Possible)
OPTIONS
A summary of options is included below.
--help, -h
Show summary of options.
A list of the input PDF files. If you plan to combine these PDFs
(without using handles) then list files in the order you want
them combined. Use - to pass a single PDF into pdftk via stdin.
Input files can be associated with handles, where a handle is a
single, upper-case letter:
=
Handles are often omitted. They are useful when specifying PDF
passwords or page ranges, later.
For example: A=input1.pdf B=input2.pdf
[input_pw ]
Input PDF owner passwords, if necessary, are associated with
files by using their handles:
=
If handles are not given, then passwords are associated with
input files by order.
Most pdftk features require that encrypted input PDF are accom-
panied by the ~owner~ password. If the input PDF has no owner
password, then the user password must be given, instead. If the
input PDF has no passwords, then no password should be given.
When running in do_ask mode, pdftk will prompt you for a pass-
word if the supplied password is incorrect or none was given.
[ ]
If this optional argument is omitted, then pdftk runs in 'fil-
ter' mode. Filter mode takes only one PDF input and creates a
new PDF after applying all of the output options, like encryp-
tion and compression.
Available operations are: cat, attach_files, unpack_files,
burst, fill_form, background, stamp, dump_data,
dump_data_fields, generate_fdf, update_info. Some operations
takes additional arguments, described below.
cat []
Catenates pages from input PDFs to create a new PDF. Page
order in the new PDF is specified by the order of the given
page ranges. Page ranges are described like this:
[[-
ber>[]]][]
Where the handle identifies one of the input PDF files, and
the beginning and ending page numbers are one-based refer-
ences to pages in the PDF file, and the qualifier can be even
or odd, and the page rotation can be N, S, E, W, L, R, or D.
If the handle is omitted from the page range, then the pages
are taken from the first input PDF.
The even qualifier causes pdftk to use only the even-numbered
PDF pages, so 1-6even yields pages 2, 4 and 6 in that order.
6-1even yields pages 6, 4 and 2 in that order.
The odd qualifier works similarly to the even.
The page rotation setting can cause pdftk to rotate pages and
documents. Each option sets the page rotation as follows (in
degrees): N: 0, E: 90, S: 180, W: 270, L: -90, R: +90, D:
+180. L, R, and D make relative adjustments to a page's rota-
tion.
If no arguments are passed to cat, then pdftk combines all
input PDFs in the order they were given to create the output.
NOTES:
* may be less than .
* The keyword end may be used to reference the final page of
a document instead of a page number.
* Reference a single page by omitting the ending page number.
* The handle may be used alone to represent the entire PDF
document, e.g., B1-end is the same as B.
Page Range Examples w/o Handles:
1-endE - rotate entire document 90 degrees
5 11 20
5-25oddW - take odd pages in range, rotate 90 degrees
6-1
Page Range Examples Using Handles:
Say A=in1.pdf B=in2.pdf, then:
A1-21
Bend-1odd
A72
A1-21 Beven A72
AW - rotate entire document 90 degrees
B
A2-30evenL - take the even pages from the range, remove 90
degrees from each page's rotation
A A
AevenW AoddE
AW BW BD
attach_files [to_page
PROMPT>]
Packs arbitrary files into a PDF using PDF's file attachment
features. More than one attachment may be listed after
attach_files. Attachments are added at the document level
unless the optional to_page option is given, in which case
the files are attached to the given page number (the first
page is 1, the final page is end). For example:
pdftk in.pdf attach_files table1.html table2.html to_page 6
output out.pdf
unpack_files
Copies all of the attachments from the input PDF into the
current folder or to an output directory given after output.
For example:
pdftk report.pdf unpack_files output ~/atts/
or, interactively:
pdftk report.pdf unpack_files output PROMPT
burst Splits a single, input PDF document into individual pages.
Also creates a report named doc_data.txt which is the same as
the output from dump_data. If the output section is omitted,
then PDF pages are named: pg_%04d.pdf, e.g.: pg_0001.pdf,
pg_0002.pdf, etc. To name these pages yourself, supply a
printf-styled format string via the output section. For
example, if you want pages named: page_01.pdf, page_02.pdf,
etc., pass output page_%02d.pdf to pdftk. Encryption can be
applied to the output by appending output options such as
owner_pw, e.g.:
pdftk in.pdf burst owner_pw foopass
fill_form
Fills the single input PDF's form fields with the data from
an FDF file, XFDF file or stdin. Enter the data filename
after fill_form, or use - to pass the data via stdin, like
so:
pdftk form.pdf fill_form data.fdf output form.filled.pdf
After filling a form, the form fields remain interactive
unless you also use the flatten output option. flatten merges
the form fields with the PDF pages. You can use flatten
alone, too, but only on a single PDF:
pdftk form.pdf fill_form data.fdf output out.pdf flatten
or:
pdftk form.filled.pdf output out.pdf flatten
If the input FDF file includes Rich Text formatted data in
addition to plain text, then the Rich Text data is packed
into the form fields as well as the plain text. Pdftk also
sets a flag that cues Acrobat/Reader to generate new field
appearances based on the Rich Text data. That way, when the
user opens the PDF, the viewer will create the Rich Text
fields on the spot. If the user's PDF viewer does not sup-
port Rich Text, then the user will see the plain text data
instead. If you flatten this form before Acrobat has a
chance to create (and save) new field appearances, then the
plain text field data is what you'll see.
background
Applies a PDF watermark to the background of a single input
PDF. Pass the background PDF's filename after background
like so:
pdftk in.pdf background back.pdf output out.pdf
Pdftk uses only the first page from the background PDF and
applies it to every page of the input PDF. This page is
scaled and rotated as needed to fit the input page. You can
use - to pass a background PDF into pdftk via stdin.
If the input PDF does not have a transparent background (such
as a PDF created from page scans) then the resulting back-
ground won't be visible -- use the stamp feature instead.
stamp
This behaves just like the background feature except it over-
lays the stamp PDF page on top of the input PDF document's
pages. This works best if the stamp PDF page has a transpar-
ent background.
dump_data
Reads a single, input PDF file and reports various statis-
tics, metadata, bookmarks (a/k/a outlines), and page labels
to the given output filename or (if no output is given) to
stdout. Does not create a new PDF.
dump_data_fields
Reads a single, input PDF file and reports form field statis-
tics to the given output filename or (if no output is given)
to stdout. Does not create a new PDF.
generate_fdf
Reads a single, input PDF file and generates a FDF file suit-
able for fill_form out of it to the given output filename or
(if no output is given) to stdout. Does not create a new
PDF.
update_info
Changes the metadata stored in a single PDF's Info dictionary
to match the input data file. The input data file uses the
same syntax as the output from dump_data. This does not
change the metadata stored in the PDF's XMP stream, if it has
one. For example:
pdftk in.pdf update_info in.info output out.pdf
[output
The output PDF filename may not be set to the name of an input
filename. Use - to output to stdout. When using the dump_data
operation, use output to set the name of the output data file.
When using the unpack_files operation, use output to set the
name of an output directory. When using the burst operation,
you can use output to control the resulting PDF page filenames
(described above).
[encrypt_40bit | encrypt_128bit]
If an output PDF user or owner password is given, output PDF
encryption strength defaults to 128 bits. This can be overrid-
den by specifying encrypt_40bit.
[allow]
Permissions are applied to the output PDF only if an encryption
strength is specified or an owner or user password is given. If
permissions are not specified, they default to 'none,' which
means all of the following features are disabled.
The permissions section may include one or more of the following
features:
Printing
Top Quality Printing
DegradedPrinting
Lower Quality Printing
ModifyContents
Also allows Assembly
Assembly
CopyContents
Also allows ScreenReaders
ScreenReaders
ModifyAnnotations
Also allows FillIn
FillIn
AllFeatures
Allows the user to perform all of the above, and top
quality printing.
[owner_pw]
[user_pw]
If an encryption strength is given but no passwords are sup-
plied, then the owner and user passwords remain empty, which
means that the resulting PDF may be opened and its security
parameters altered by anybody.
[compress | uncompress]
These are only useful when you want to edit PDF code in a text
editor like vim or emacs. Remove PDF page stream compression by
applying the uncompress filter. Use the compress filter to
restore compression.
[flatten]
Use this option to merge an input PDF's interactive form fields
(and their data) with the PDF's pages. Only one input PDF may be
given. Sometimes used with the fill_form operation.
[keep_first_id | keep_final_id]
When combining pages from multiple PDFs, use one of these
options to copy the document ID from either the first or final
input document into the new output PDF. Otherwise pdftk creates
a new document ID for the output PDF. When no operation is
given, pdftk always uses the ID from the (single) input PDF.
[drop_xfa]
If your input PDF is a form created using Acrobat 7 or Adobe
Designer, then it probably has XFA data. Filling such a form
using pdftk yields a PDF with data that fails to display in
Acrobat 7 (and 6?). The workaround solution is to remove the
form's XFA data, either before you fill the form using pdftk or
at the time you fill the form. Using this option causes pdftk to
omit the XFA data from the output PDF form.
This option is only useful when running pdftk on a single input
PDF. When assembling a PDF from multiple inputs using pdftk,
any XFA data in the input is automatically omitted.
[verbose]
By default, pdftk runs quietly. Append verbose to the end and it
will speak up.
[dont_ask | do_ask]
Depending on the compile-time settings (see ASK_ABOUT_WARNINGS),
pdftk might prompt you for further input when it encounters a
problem, such as a bad password. Override this default behavior
by adding dont_ask (so pdftk won't ask you what to do) or do_ask
(so pdftk will ask you what to do).
When running in dont_ask mode, pdftk will over-write files with
its output without notice.
EXAMPLES
Decrypt a PDF
pdftk secured.pdf input_pw foopass output unsecured.pdf
Encrypt a PDF using 128-bit strength (the default), withhold all per-
missions (the default)
pdftk 1.pdf output 1.128.pdf owner_pw foopass
Same as above, except password 'baz' must also be used to open output
PDF
pdftk 1.pdf output 1.128.pdf owner_pw foo user_pw baz
Same as above, except printing is allowed (once the PDF is open)
pdftk 1.pdf output 1.128.pdf owner_pw foo user_pw baz allow printing
Join in1.pdf and in2.pdf into a new PDF, out1.pdf
pdftk in1.pdf in2.pdf cat output out1.pdf
or (using handles):
pdftk A=in1.pdf B=in2.pdf cat A B output out1.pdf
or (using wildcards):
pdftk *.pdf cat output combined.pdf
Remove 'page 13' from in1.pdf to create out1.pdf
pdftk in.pdf cat 1-12 14-end output out1.pdf
or:
pdftk A=in1.pdf cat A1-12 A14-end output out1.pdf
Apply 40-bit encryption to output, revoking all permissions (the
default). Set the owner PW to 'foopass'.
pdftk 1.pdf 2.pdf cat output 3.pdf encrypt_40bit owner_pw foopass
Join two files, one of which requires the password 'foopass'. The out-
put is not encrypted.
pdftk A=secured.pdf 2.pdf input_pw A=foopass cat output 3.pdf
Uncompress PDF page streams for editing the PDF in a text editor (e.g.,
vim, emacs)
pdftk doc.pdf output doc.unc.pdf uncompress
Repair a PDF's corrupted XREF table and stream lengths, if possible
pdftk broken.pdf output fixed.pdf
Burst a single PDF document into pages and dump its data to
doc_data.txt
pdftk in.pdf burst
Burst a single PDF document into encrypted pages. Allow low-quality
printing
pdftk in.pdf burst owner_pw foopass allow DegradedPrinting
Write a report on PDF document metadata and bookmarks to report.txt
pdftk in.pdf dump_data output report.txt
Rotate the first PDF page to 90 degrees clockwise
pdftk in.pdf cat 1E 2-end output out.pdf
Rotate an entire PDF document to 180 degrees
pdftk in.pdf cat 1-endS output out.pdf
<--END OF FILE-->
Along comes pdftk (PDF toolkit) to the rescue - see Download PDF Toolkit
This a command line tool which does a lot more than just allow the concatenation of PDF but for todays blog I just wanted to pass on how I merged two source pdfs into one:
Ok, so you need to extract the pdftk.exe from the zip file downloaded from the link above. Open up a command prompt (oh yes and I am assuming you are running this on Windows). Navigate to the folder with the pdftk.exe in it.
Now in my example I had two pdf files - non_disclosure_agreement_p1.pdf and non_disclosure_agreement_p2.pdf both situated in the root of the e drive. I have just unzipped the pdftk file into my documents folder - so c:\documents and settings\steve\my documents - so my goal was to get a merged pdf in this same my document folder. Like so:
pdftk e\non_disclosure_agreement_p1.pdf e:\non_disclosure_agreement_p2.pdf cat output non_disclosure_agreement.pdf
this does the job! the cat command concatenates the two inputs, which could have been many more files. The output statement then declares the location and filename of the output file. In this case I just supplied a filename and therefore created the new file in the my documents folder. Now as you can see this was a really simple use of the tool kit.
If you run pdftk --help you get a help listing.
I have copied and pasted the help text here - which you can review the other features available:
<--HELP LISTING-->
pdftk 1.41 a Handy Tool for Manipulating PDF Documents
Copyright (C) 2003-06, Sid Steward - Please Visit: www.pdftk.com
This is free software; see the source code for copying conditions. There is
NO warranty, not even for MERCHANTABILITY or FITNESS FOR A PARTICULAR PURPOSE.
SYNOPSIS
pdftk
[input_pw ]
[
[output
[encrypt_40bit | encrypt_128bit]
[allow
[owner_pw
[user_pw
[flatten] [compress | uncompress]
[keep_first_id | keep_final_id] [drop_xfa]
[verbose] [dont_ask | do_ask]
Where:
[cat | attach_files | unpack_files | burst |
fill_form | background | stamp | generate_fdf
dump_data | dump_data_fields | update_info]
For Complete Help: pdftk --help
DESCRIPTION
If PDF is electronic paper, then pdftk is an electronic staple-remover,
hole-punch, binder, secret-decoder-ring, and X-Ray-glasses. Pdftk is a
simple tool for doing everyday things with PDF documents. Use it to:
* Merge PDF Documents
* Split PDF Pages into a New Document
* Rotate PDF Documents or Pages
* Decrypt Input as Necessary (Password Required)
* Encrypt Output as Desired
* Fill PDF Forms with X/FDF Data and/or Flatten Forms
* Generate FDF Data Stencil from PDF Forms
* Apply a Background Watermark or a Foreground Stamp
* Report PDF Metrics such as Metadata and Bookmarks
* Update PDF Metadata
* Attach Files to PDF Pages or the PDF Document
* Unpack PDF Attachments
* Burst a PDF Document into Single Pages
* Uncompress and Re-Compress Page Streams
* Repair Corrupted PDF (Where Possible)
OPTIONS
A summary of options is included below.
--help, -h
Show summary of options.
A list of the input PDF files. If you plan to combine these PDFs
(without using handles) then list files in the order you want
them combined. Use - to pass a single PDF into pdftk via stdin.
Input files can be associated with handles, where a handle is a
single, upper-case letter:
=
Handles are often omitted. They are useful when specifying PDF
passwords or page ranges, later.
For example: A=input1.pdf B=input2.pdf
[input_pw ]
Input PDF owner passwords, if necessary, are associated with
files by using their handles:
=
If handles are not given, then passwords are associated with
input files by order.
Most pdftk features require that encrypted input PDF are accom-
panied by the ~owner~ password. If the input PDF has no owner
password, then the user password must be given, instead. If the
input PDF has no passwords, then no password should be given.
When running in do_ask mode, pdftk will prompt you for a pass-
word if the supplied password is incorrect or none was given.
[
If this optional argument is omitted, then pdftk runs in 'fil-
ter' mode. Filter mode takes only one PDF input and creates a
new PDF after applying all of the output options, like encryp-
tion and compression.
Available operations are: cat, attach_files, unpack_files,
burst, fill_form, background, stamp, dump_data,
dump_data_fields, generate_fdf, update_info. Some operations
takes additional arguments, described below.
cat [
Catenates pages from input PDFs to create a new PDF. Page
order in the new PDF is specified by the order of the given
page ranges. Page ranges are described like this:
[
ber>[
Where the handle identifies one of the input PDF files, and
the beginning and ending page numbers are one-based refer-
ences to pages in the PDF file, and the qualifier can be even
or odd, and the page rotation can be N, S, E, W, L, R, or D.
If the handle is omitted from the page range, then the pages
are taken from the first input PDF.
The even qualifier causes pdftk to use only the even-numbered
PDF pages, so 1-6even yields pages 2, 4 and 6 in that order.
6-1even yields pages 6, 4 and 2 in that order.
The odd qualifier works similarly to the even.
The page rotation setting can cause pdftk to rotate pages and
documents. Each option sets the page rotation as follows (in
degrees): N: 0, E: 90, S: 180, W: 270, L: -90, R: +90, D:
+180. L, R, and D make relative adjustments to a page's rota-
tion.
If no arguments are passed to cat, then pdftk combines all
input PDFs in the order they were given to create the output.
NOTES:
*
* The keyword end may be used to reference the final page of
a document instead of a page number.
* Reference a single page by omitting the ending page number.
* The handle may be used alone to represent the entire PDF
document, e.g., B1-end is the same as B.
Page Range Examples w/o Handles:
1-endE - rotate entire document 90 degrees
5 11 20
5-25oddW - take odd pages in range, rotate 90 degrees
6-1
Page Range Examples Using Handles:
Say A=in1.pdf B=in2.pdf, then:
A1-21
Bend-1odd
A72
A1-21 Beven A72
AW - rotate entire document 90 degrees
B
A2-30evenL - take the even pages from the range, remove 90
degrees from each page's rotation
A A
AevenW AoddE
AW BW BD
attach_files
PROMPT>]
Packs arbitrary files into a PDF using PDF's file attachment
features. More than one attachment may be listed after
attach_files. Attachments are added at the document level
unless the optional to_page option is given, in which case
the files are attached to the given page number (the first
page is 1, the final page is end). For example:
pdftk in.pdf attach_files table1.html table2.html to_page 6
output out.pdf
unpack_files
Copies all of the attachments from the input PDF into the
current folder or to an output directory given after output.
For example:
pdftk report.pdf unpack_files output ~/atts/
or, interactively:
pdftk report.pdf unpack_files output PROMPT
burst Splits a single, input PDF document into individual pages.
Also creates a report named doc_data.txt which is the same as
the output from dump_data. If the output section is omitted,
then PDF pages are named: pg_%04d.pdf, e.g.: pg_0001.pdf,
pg_0002.pdf, etc. To name these pages yourself, supply a
printf-styled format string via the output section. For
example, if you want pages named: page_01.pdf, page_02.pdf,
etc., pass output page_%02d.pdf to pdftk. Encryption can be
applied to the output by appending output options such as
owner_pw, e.g.:
pdftk in.pdf burst owner_pw foopass
fill_form
Fills the single input PDF's form fields with the data from
an FDF file, XFDF file or stdin. Enter the data filename
after fill_form, or use - to pass the data via stdin, like
so:
pdftk form.pdf fill_form data.fdf output form.filled.pdf
After filling a form, the form fields remain interactive
unless you also use the flatten output option. flatten merges
the form fields with the PDF pages. You can use flatten
alone, too, but only on a single PDF:
pdftk form.pdf fill_form data.fdf output out.pdf flatten
or:
pdftk form.filled.pdf output out.pdf flatten
If the input FDF file includes Rich Text formatted data in
addition to plain text, then the Rich Text data is packed
into the form fields as well as the plain text. Pdftk also
sets a flag that cues Acrobat/Reader to generate new field
appearances based on the Rich Text data. That way, when the
user opens the PDF, the viewer will create the Rich Text
fields on the spot. If the user's PDF viewer does not sup-
port Rich Text, then the user will see the plain text data
instead. If you flatten this form before Acrobat has a
chance to create (and save) new field appearances, then the
plain text field data is what you'll see.
background
Applies a PDF watermark to the background of a single input
PDF. Pass the background PDF's filename after background
like so:
pdftk in.pdf background back.pdf output out.pdf
Pdftk uses only the first page from the background PDF and
applies it to every page of the input PDF. This page is
scaled and rotated as needed to fit the input page. You can
use - to pass a background PDF into pdftk via stdin.
If the input PDF does not have a transparent background (such
as a PDF created from page scans) then the resulting back-
ground won't be visible -- use the stamp feature instead.
stamp
This behaves just like the background feature except it over-
lays the stamp PDF page on top of the input PDF document's
pages. This works best if the stamp PDF page has a transpar-
ent background.
dump_data
Reads a single, input PDF file and reports various statis-
tics, metadata, bookmarks (a/k/a outlines), and page labels
to the given output filename or (if no output is given) to
stdout. Does not create a new PDF.
dump_data_fields
Reads a single, input PDF file and reports form field statis-
tics to the given output filename or (if no output is given)
to stdout. Does not create a new PDF.
generate_fdf
Reads a single, input PDF file and generates a FDF file suit-
able for fill_form out of it to the given output filename or
(if no output is given) to stdout. Does not create a new
PDF.
update_info
Changes the metadata stored in a single PDF's Info dictionary
to match the input data file. The input data file uses the
same syntax as the output from dump_data. This does not
change the metadata stored in the PDF's XMP stream, if it has
one. For example:
pdftk in.pdf update_info in.info output out.pdf
[output
The output PDF filename may not be set to the name of an input
filename. Use - to output to stdout. When using the dump_data
operation, use output to set the name of the output data file.
When using the unpack_files operation, use output to set the
name of an output directory. When using the burst operation,
you can use output to control the resulting PDF page filenames
(described above).
[encrypt_40bit | encrypt_128bit]
If an output PDF user or owner password is given, output PDF
encryption strength defaults to 128 bits. This can be overrid-
den by specifying encrypt_40bit.
[allow
Permissions are applied to the output PDF only if an encryption
strength is specified or an owner or user password is given. If
permissions are not specified, they default to 'none,' which
means all of the following features are disabled.
The permissions section may include one or more of the following
features:
Printing
Top Quality Printing
DegradedPrinting
Lower Quality Printing
ModifyContents
Also allows Assembly
Assembly
CopyContents
Also allows ScreenReaders
ScreenReaders
ModifyAnnotations
Also allows FillIn
FillIn
AllFeatures
Allows the user to perform all of the above, and top
quality printing.
[owner_pw
[user_pw
If an encryption strength is given but no passwords are sup-
plied, then the owner and user passwords remain empty, which
means that the resulting PDF may be opened and its security
parameters altered by anybody.
[compress | uncompress]
These are only useful when you want to edit PDF code in a text
editor like vim or emacs. Remove PDF page stream compression by
applying the uncompress filter. Use the compress filter to
restore compression.
[flatten]
Use this option to merge an input PDF's interactive form fields
(and their data) with the PDF's pages. Only one input PDF may be
given. Sometimes used with the fill_form operation.
[keep_first_id | keep_final_id]
When combining pages from multiple PDFs, use one of these
options to copy the document ID from either the first or final
input document into the new output PDF. Otherwise pdftk creates
a new document ID for the output PDF. When no operation is
given, pdftk always uses the ID from the (single) input PDF.
[drop_xfa]
If your input PDF is a form created using Acrobat 7 or Adobe
Designer, then it probably has XFA data. Filling such a form
using pdftk yields a PDF with data that fails to display in
Acrobat 7 (and 6?). The workaround solution is to remove the
form's XFA data, either before you fill the form using pdftk or
at the time you fill the form. Using this option causes pdftk to
omit the XFA data from the output PDF form.
This option is only useful when running pdftk on a single input
PDF. When assembling a PDF from multiple inputs using pdftk,
any XFA data in the input is automatically omitted.
[verbose]
By default, pdftk runs quietly. Append verbose to the end and it
will speak up.
[dont_ask | do_ask]
Depending on the compile-time settings (see ASK_ABOUT_WARNINGS),
pdftk might prompt you for further input when it encounters a
problem, such as a bad password. Override this default behavior
by adding dont_ask (so pdftk won't ask you what to do) or do_ask
(so pdftk will ask you what to do).
When running in dont_ask mode, pdftk will over-write files with
its output without notice.
EXAMPLES
Decrypt a PDF
pdftk secured.pdf input_pw foopass output unsecured.pdf
Encrypt a PDF using 128-bit strength (the default), withhold all per-
missions (the default)
pdftk 1.pdf output 1.128.pdf owner_pw foopass
Same as above, except password 'baz' must also be used to open output
pdftk 1.pdf output 1.128.pdf owner_pw foo user_pw baz
Same as above, except printing is allowed (once the PDF is open)
pdftk 1.pdf output 1.128.pdf owner_pw foo user_pw baz allow printing
Join in1.pdf and in2.pdf into a new PDF, out1.pdf
pdftk in1.pdf in2.pdf cat output out1.pdf
or (using handles):
pdftk A=in1.pdf B=in2.pdf cat A B output out1.pdf
or (using wildcards):
pdftk *.pdf cat output combined.pdf
Remove 'page 13' from in1.pdf to create out1.pdf
pdftk in.pdf cat 1-12 14-end output out1.pdf
or:
pdftk A=in1.pdf cat A1-12 A14-end output out1.pdf
Apply 40-bit encryption to output, revoking all permissions (the
default). Set the owner PW to 'foopass'.
pdftk 1.pdf 2.pdf cat output 3.pdf encrypt_40bit owner_pw foopass
Join two files, one of which requires the password 'foopass'. The out-
put is not encrypted.
pdftk A=secured.pdf 2.pdf input_pw A=foopass cat output 3.pdf
Uncompress PDF page streams for editing the PDF in a text editor (e.g.,
vim, emacs)
pdftk doc.pdf output doc.unc.pdf uncompress
Repair a PDF's corrupted XREF table and stream lengths, if possible
pdftk broken.pdf output fixed.pdf
Burst a single PDF document into pages and dump its data to
doc_data.txt
pdftk in.pdf burst
Burst a single PDF document into encrypted pages. Allow low-quality
printing
pdftk in.pdf burst owner_pw foopass allow DegradedPrinting
Write a report on PDF document metadata and bookmarks to report.txt
pdftk in.pdf dump_data output report.txt
Rotate the first PDF page to 90 degrees clockwise
pdftk in.pdf cat 1E 2-end output out.pdf
Rotate an entire PDF document to 180 degrees
pdftk in.pdf cat 1-endS output out.pdf
<--END OF FILE-->
Thursday, 4 June 2009
How do you use a .NET XMLDocument SelectNodes and the default namespace?
I have just been trying to load an XML document into a .NET XMLDocument and then use the SelectNodes method passing an XPath string to get a XMLNodeList in return. Easy so I thought! The XML being loaded did have a default namespace, and as such all the elements within it did not have any namespace references... and equally therefore I assumed that my XPath query would not need any namespace prefix especially since the XML loaded had none. Alas, my code didn't work!
The solution, and of course easy when you know how, is to use an XMLNamespaceManager object and add a reference to your default namespace (or any other namespaces used within your document) but the key thing is to add a prefix - it does not matter than the source XML isn't using prefixes. My initial thought was to just add the namespace again without a prefix - nope, this doesn't work! No, once you add the namespace with prefix, and then pass the namespace manager object as a parameter in your SelectNodes call plus your newly prefixed xpath query and you will find delightedly you have some result nodes!!
An example...
//So key to note that the lcw namespace is the default namespace in my XML file it has no prefix in the file - but here it not associated with the prefix lcw
xmlSupplierMap = new XmlDocument();
namespaceMan = new XmlNamespaceManager(xmlSupplierMap.NameTable);
namespaceMan.AddNamespace("lcw", http://www.defaultnamespace.domain/blah);
xmlSupplierMap.Load("filename of xml.xml");
//My new XPath query uses the prefix assigned previously lcw: and bingo we get data!
XmlNodeList worksheetNodelist = xmlSupplierMap.SelectNodes("lcw:worksheet", namespaceMan);
Monday, 25 May 2009
How do you get TimeSpan properties to serialise to XML
I have just noticed that when using the XMLSerializer to write TimeSpan data to an XML output does not work - the public element is always written but is always blank!
Microsoft acknowledge the issue here
https://connect.microsoft.com/VisualStudio/feedback/ViewFeedback.aspx?FeedbackID=94492
Fortunately as always with these things not all is lost - and thanks to the web I have found a number of solutions...
http://stackoverflow.com/questions/637933/net-how-to-serialize-a-timespan-to-xml
http://lucaspirot.blogspot.com/2009/04/xml-serialization-and-timespan-bug.html
You could of course take on the serialisation by hand and format the entire object but this seems like hard work to me! Of course if your class has a large number of TimeSpan properties it may be worth the effort...
The two options best described by the two articles linked above both require a new property or public variable.
The first an I think most simple just requires a new property of type long which you now store your TimeSpan.Ticks value within it. Where in the example below StartTime was the original TimeSpan property - You can of course exclude the original TimeSpan property from the serialisation using the [XmlIgnore] attribute prior to the property.
[XmlElement("StartTimeTicks")]
[Browsable(false), EditorBrowsable(EditorBrowsableState.Never)]
public long StartTimeTicks
{
get { return StartTime.Ticks; }
set { StartTime = new TimeSpan(value);}
}
The alternative to the this approach is to just add a public long variable, again to hold the TimeSpan ticks value. Rather than using the property setter and getters - which for this scenario I prefer, you can set up two new methods descorated with the [OnSerializing] and [OnDeserializing] attributes. So the serialisation method you assign the TimeSpan.Ticks value to the variable and the deserialisation method updates your actual TimeSpan property based on the ticks value deserialised.
Personally, whilst the later method works just as well it seems like a lot more work - of course now I think about it, if you have multiple TimeSpan properties that need to be managed you could use the latter method to centralise all of the logic in two methods rather than multiple getters and setters. Your call, I hope this may of helped!!
Thursday, 14 May 2009
How do you stop a Virtual PC from synchronising its date time with the host PC?
Ever wondered how you can stop a virtual PC image synchronising its date and time with the host machine? Sometimes when testing it’s handy to be able to test in an identical environment each time – so if the date has moved on a few days tests that once passed no longer work or at least behave differently.
There is a way though!
Find your most beloved XML editor, or even notepad will do (just be extra careful when editing in notepad you don’t make any errors) I used XMLNotepad.
You can get XML notepad from here:
http://www.microsoft.com/downloads/details.aspx?familyid=72d6aa49-787d-4118-ba5f-4f30fe913628&displaylang=en
Open up your Virtual PC definition file – the .vmc file.
Scroll down and find <integration><microsoft><components>
Now you may or may not have this, but this is the key – under the <components>node you need to have – you may have had this element but it will likely be set to true.
<host_time_sync>
<enabled type="”boolean”">false</enabled>
</host_time_sync>
Save the vmc and reboot and you should be away! If you alter the virtual machine date/time and then commit the changes you should find once you reboot that the date and time have not altered since the commit changes.
Beware! I did read on here http://mcpmag.com/columns/article.asp?editorialsid=1649 that if you were to reboot the virtual PC without commiting the machine changes it will in fact resync the date/time again. So just in case!
Wednesday, 13 May 2009
How do I resize a Virtual PC .vhd file?
Ok so you have setup virtual PC 2007 intially with loads of room for your OS and applications but later discover your close to running out of space! The good news is, with a bit of work, you can actually expand the space you have available.
First you need a copy of VHDResizer:
Join the community first here:http://vmtoolkit.com/user/CreateUser.aspx?ReturnUrl=/default.aspx
The VHDResizer can be downloaded here : http://vmtoolkit.com/files/folders/converters/entry87.aspx
There are a few posts on here that suggest the resize does not work – I have found it to work a treat but have found you need to resize the partition of the drive that has been resized. I describe how to do this in another post to follow ( How do I resize a Virtual PC 2007 drive? Even after I have used Resizer the partition size is unchanged... ):
Here’s the easy bit, once you have installed the resizer, just run and select the drive you want to resize:

Simply select the drive you want to resize and open it:
Choose a destination file for the resized version to be saved to, select the type and size of the destination, click resize and you are away! Obviously depending on the size of files involved this can take a while.
Once done you can connect up your new resized drive as the primary drive of your virtual machine. Give it a test. Don’t for the moment get rid of your original file – it’s obviously good for backup and you may well need it in a moment for another post....
When you boot up using the resized file have a look at the C drive size, has it changed? If not, double check using the disk management snap in:
Click on the Start Button, and select
Control Panel (assumes you are in classic view), and then select Administrative Tools followed by Computer Management. Within the Computer Management snap-in select the Disk Management item under storage. As below:

If you find this situation and your primary drive is now resized in total but the primary partition remains unchanged. So in the image the primary partition is 19.5 gig yet there is 30 gig unallocated – have a read of my other post How do I resize a Virtual PC 2007 drive? Even after I have used Resizer the partition size is unchanged... and you then should be back and running!
Monday, 11 May 2009
How do I resize a Virtual PC 2007 drive? Even after I have used Resizer the partition size is unchanged...
Using Virtual PC 2007 I found that I had created the OS primary drive with too little space. I had originally thought that I had allocated loads of room until of course inevitably the time comes and you can’t believe the bytes remaining! Fear not, you can get around this of course as long as you have enough space on the machine you are working on. Firstly, if you haven’t done so already have a read of the this post: using resizer to increase your vhd files. Once you have done that return here for a few remaining steps:

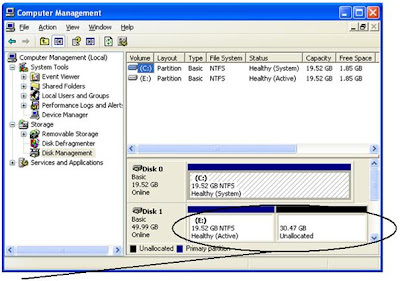
Notice that the VHD resizer has done a fine job resizing the disk as a whole but the original partition within in the disk is the same size. The next few steps will readdress this making the partition match the size of the disk.
Check the name of the extended disk name – most likely to be disk 1 as shown here
Start a Command Prompt – if you like keyboard shortcuts you can use the Windows Key + R to open the ‘Run’ dialog and then type cmd and hit enter...
From within the running Command Prompt enter the command DISKPART
To review the drives again type LIST DISK followed by the enter key
Again disk 1 is visible, to work with this disk use the SELECT command as below:
SELECT DISK 1

Now the disk that we want to extend the partition for is selected we can now view the disk in detail using DETAIL DISK
Based on the disk details now select the volume using SELECT, so SELECT VOLUME 2 in the example:
Here are some virtual PC links on the Microsoft site if you want to give this great bit of software a try
Virtual PC home page - http://www.microsoft.com/windows/virtual-pc/default.aspx
Virtual PC 2007 download -http://www.microsoft.com/downloads/details.aspx?FamilyId=04D26402-3199-48A3-AFA2-2DC0B40A73B6&displaylang=en
Virtual PC 2007 SP1 download-http://www.microsoft.com/downloads/details.aspx?familyid=28C97D22-6EB8-4A09-A7F7-F6C7A1F000B5&displaylang=en
If you already have Virtual PC 2007 running and you have a disk that you want to increase in size here is the link to the VHDResizer : http://vmtoolkit.com/files/folders/converters/entry87.aspx
Right, you have a newly resized vhd file but if you boot a virtual machine from the link you still find the virtual machine declares the drive size is unchanged?
You kept the original vhd file before resizing, right? Ok, before restarting Virtual PC again, go to the setup screen of the VPC and make your old vhd file the primary drive and then the newly resized drive hard as drive two (Open the Virtual PC console, click on the settings button of the PC you want to change and select the vhd drives. Once the drives are selected, click OK to accept the changes and then start the virtual PC as normal)

Once your machine has started let’s review the drives configured on the machine:
Click on the Start Button, and select
Control Panel (assumes you are in classic view), and then select Administrative Tools followed by Computer Management. Within the Computer Management snap-in select the Disk Management item under storage. As below:
Click on the Start Button, and select
Control Panel (assumes you are in classic view), and then select Administrative Tools followed by Computer Management. Within the Computer Management snap-in select the Disk Management item under storage. As below:

Notice that the VHD resizer has done a fine job resizing the disk as a whole but the original partition within in the disk is the same size. The next few steps will readdress this making the partition match the size of the disk.
Check the name of the extended disk name – most likely to be disk 1 as shown here
Start a Command Prompt – if you like keyboard shortcuts you can use the Windows Key + R to open the ‘Run’ dialog and then type cmd and hit enter...
From within the running Command Prompt enter the command DISKPART
To review the drives again type LIST DISK followed by the enter key
Again disk 1 is visible, to work with this disk use the SELECT command as below:
SELECT DISK 1

Now the disk that we want to extend the partition for is selected we can now view the disk in detail using DETAIL DISK
Based on the disk details now select the volume using SELECT

Finally, and very simply, to get the originally smaller partition to utilise all the space now available type EXTEND
And that’s it – if you left the Computer Management/Disk Management window open you will immediately have seen the drive change:
The E drive in this example is now one partition of 50 gig space. Close your machine session and commit the changes and then all that remains is to return to your virtual machine setup and make your new extended hard drive the master drive. You can then move/delete/backup the original vhd file (as you so wish!)
Subscribe to:
Posts (Atom)