Virtual PC home page - http://www.microsoft.com/windows/virtual-pc/default.aspx
Virtual PC 2007 download -http://www.microsoft.com/downloads/details.aspx?FamilyId=04D26402-3199-48A3-AFA2-2DC0B40A73B6&displaylang=en
Virtual PC 2007 SP1 download-http://www.microsoft.com/downloads/details.aspx?familyid=28C97D22-6EB8-4A09-A7F7-F6C7A1F000B5&displaylang=en
Right, you have a newly resized vhd file but if you boot a virtual machine from the link you still find the virtual machine declares the drive size is unchanged?
You kept the original vhd file before resizing, right? Ok, before restarting Virtual PC again, go to the setup screen of the VPC and make your old vhd file the primary drive and then the newly resized drive hard as drive two (Open the Virtual PC console, click on the settings button of the PC you want to change and select the vhd drives. Once the drives are selected, click OK to accept the changes and then start the virtual PC as normal)
Click on the Start Button, and select
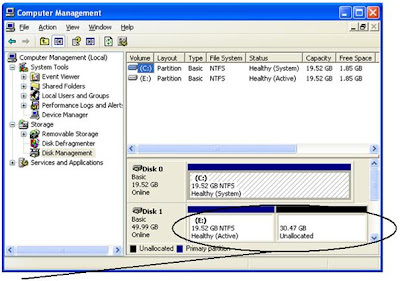
Control Panel (assumes you are in classic view), and then select Administrative Tools followed by Computer Management. Within the Computer Management snap-in select the Disk Management item under storage. As below:

Notice that the VHD resizer has done a fine job resizing the disk as a whole but the original partition within in the disk is the same size. The next few steps will readdress this making the partition match the size of the disk.
Check the name of the extended disk name – most likely to be disk 1 as shown here
Start a Command Prompt – if you like keyboard shortcuts you can use the Windows Key + R to open the ‘Run’ dialog and then type cmd and hit enter...
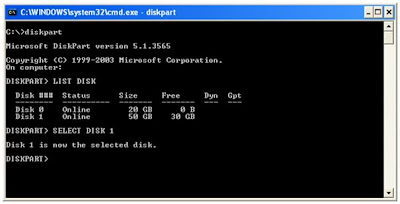
From within the running Command Prompt enter the command DISKPART
To review the drives again type LIST DISK followed by the enter key
Again disk 1 is visible, to work with this disk use the SELECT command as below:
SELECT DISK 1

Now the disk that we want to extend the partition for is selected we can now view the disk in detail using DETAIL DISK
Based on the disk details now select the volume using SELECT
Finally, and very simply, to get the originally smaller partition to utilise all the space now available type EXTEND
And that’s it – if you left the Computer Management/Disk Management window open you will immediately have seen the drive change:
The E drive in this example is now one partition of 50 gig space. Close your machine session and commit the changes and then all that remains is to return to your virtual machine setup and make your new extended hard drive the master drive. You can then move/delete/backup the original vhd file (as you so wish!)


No comments:
Post a Comment