Wednesday, 26 August 2009

How to create an HTML signature in Outlook?

I have just been trying to add a banner to an HTML email. Initially I thought I would create an HTML page and then tried to link this using the Outlook signature creator pointing to the HTML file... I tried this and nothing appeared! So I can only assume my HTML which I purposely kept really simple and used tables which I had previously read would make an email more likely to work but alas not!

But, thanks to another blogger out there a fantiastically simply yet effective solution to this is to open your HTML page that displays page as you want. Then highlight the page in your browser and copy. In the Outlook signature admin, just add a new signature for editing and then paste what you have just copied into the editor and bingo, the HTML I was slaving to work is just there!!

If still not quite to your satifsfaction you can edit the resulting HTML by going to C:\Documents and Settings\\Application Data\Microsoft\Signatures and in there you will find your signature file as an .htm So once you are roughly happy with the appearance in the signature editor you still go back to the htm file and now tweak as needed. So I found this a really easy way to do it!

Friday, 21 August 2009

How do you populate a new email from an HTML onclick code?

I have used HTML links before with the href set to mailto:address@blah.com, which always work a treat. Today though needed the same functionality as a straightforward mailto link but via an onclick event of a DIV I'm using as a button.

Not difficult once you know how, and I also found out a couple of neat new tricks for populating the mail client with values.

All the onclick code requires is:

onclick="self.location = 'mailto:help@selfhelpsupemarket.com'"

This works just as a normal mailto. What I found out looking this up is you can pre-populate the cc, bcc, subject and the message body as well which coule be very useful! I imagine the following works for a normal link as well as the onclick, additionally the testing I did was with an Outlook 2007 client so I don't know how other clients will behave but here's the code anyway!

Simply append to the mailto: email address a query string using cc, bcc, subject and or body fields to pre-populate the client mail message with the appropriate fields filled. All the fields are optional so you only need to use the fields appropriate to your task. All fields and values need to be separated with ampersand.

A couple of examples:

mailto:steve@t.com?subject=hello from website&cc=info@test.com

So create a new email to be sent to steve@t.com, cc'd to info@t.com with a subject of hello from website.

mailto:steve@t.com?subject=hello from website&body=Dear Steve,

This one will create a new message again to steve@t.com with the same subject but the message body is started with Dear Steve.


How do you subscript or superscript html text without affecting the paragraph line spacing?

Bit of a long title today but a simple request!

I have only one character in some text that I would like to subscript. Initially I used html 'sub' element which I can't deny does work but if you have multiple lines of text the line that displays the subscript will end up having a greater line height than the others which in my pedantic world caused nightmares!

Let's see if I can demonstrate here:

line1 with a subscript number 1 after line
some other lines follow this one without any super or sub script features.

There is another way though which now allows me to sleep at night : ) hurrah. Simply use a span around your subscript item (or super) and set it style to:

position: relative;top: 0.3em;

from this you can obviously change the top value to choose the character position and in fact make it superscript. Here is the updated version below:

line1 with a subscript number 1 after line
and some superscript using a top of -0.3em easy.
some other lines follow this one without any super or sub script features.

better?!

Thursday, 20 August 2009

How do you change the size of the rectangle margue in Photoshop Elements?

I have just been working on some images in the Photoshop Elements again and it has always annoyed me that when I use the rectangle selection tool, that once I let go of the mouse I cannot change its size, only move it. I doubted you couldn't I just didn't know how - a big difference!

I have discovered once you have let go of the mouse while using the selection tool (I noticed this works for the crop tool too - and no doubt others) you really cannot resize the selection BUT if you keep the mouse button down - and then press and hold the spacebar, when you do this the selection moves, let go of the spacebar and the selection resizes again. Do all of this while keeping the mouse button down.

I used to find myself selecting part of the screen and getting a rough size right but found I was a few pixels out and then would try to resize the selection - and this really doesn't work. So using the technique above allows you to get the surrounding size about right, find you are a few pixels out and then use the spacebar move option to nudge those pixels out and then release the bar and resize the image back again. Neat!

Whilst not difficult it did take a few goes to perfect the technique since my mind was still thinking draw the shape and then, after a coffee perhaps, go back and resize!!

Tuesday, 18 August 2009

How do you change the mouse cursor using CSS?

An easy one for all the HTML and CSS gurus out there, but up until today I wasn't even aware you could change the cursor on an HTML page using CSS.

So earlier on, I have a number of DIVs that are in effect some large buttons which I have added some hover code to show highlighting etc, which of course led me to ideally need to change the cursor so the user knows clicking will be applicable. All you need is to set the cursor style to pointer - in the case a hand for links e.g

.mylink {cursor:pointer}

Now of course there are a load of other cursor values - auto, crosshair, default, e-resize, help, move, n-resize, ne-resize, nw-resize, pointer, s-resize, se-resize, sw-resize, text, wait, w-resize. Which most are fairly self explanatary I think but at least you can change them now!

Finally, and I havn't tried this but you can even go so far as providing yor own cursors! You do this specifying a url in the CSS cursor:url('path to cursor'). I haven't tried this, and may not need to, but if I do I will add new a post!!
How do you get an image to appear in an DIV, paths?

This is a silly one. I have used without a problem the CSS background-image: statement including backgrounds for DIVs, until today that is....

I have an html document in the root folder, along with two sub folders: a resorces folder for my stylesheet style.css and an images folder for all the images. Before the lightbulb switched on I referenced my images as background-image:url('images/image_name.jpg') BUT to my frustration for a good half an hour was the images did not appear - now I was trying to use a background for a DIV but it could have been any images.

The light bulb moment - I feel daft for admitting to the problem but I have seen it before and still did not remember... so the issue is simply this - the path used is relative to the stylesheet loaded and NOT the HTML document as I imagined. So, I originally used '/images/imagename.jpg' which is relative to the html, and what I needed for it to work was actually a path like '../images/imagename.jpg' which is because the stylesheet is in a resources folder, so the path needs to be a parent folder above before navigating to the images folder.

Like I said a real simple one to solve, but when I was convinced in my mind the path should be relative to the root folder it took quite a bit of head bashing to get it fixed!

Saturday, 15 August 2009

How do you know what all the new office 2007 extensions are?

I have just been sent an Excel document with an .xlsm extension and wondered what the heck this meant. With a bit of a search this is a 2007 open XML format with macros enabled, so an xlsx document is without macros.

This microsoft link clears up the what and why of the new extensions here: http://office.microsoft.com/en-us/help/HA100069351033.aspx?pid=CH102457411033

On a similar note if you need to open said new formats in an earlier version of Office you can do by using this compatibility pack here - http://www.microsoft.com/downloads/details.aspx?displaylang=en&FamilyID=941b3470-3ae9-4aee-8f43-c6bb74cd1466 I have been using this with an Office 2003 installation and it does seem to work well. The only thing is there is a noticable time lag opening and saving the files - which based on the conversion work to bedone I guess this is no surprise.

Reading the above document, the Office 2007 release includes a feature to inspect a document for personal information. So within Excel if you load a document, click the Office button, selct prepare and then inspect document - it will then all you remove all personal references from the saved document, very neat. Have a look here for the complete details. http://office.microsoft.com/en-us/help/HA100375931033.aspx

Friday, 14 August 2009

How do you look at Outlook's autosuggest email addresses?

I was just typing in some email addresses and could see from the Outlook auto suggest list a number of email addresses that I would like to cut and paste into another application - which is easier said than done!

There is a file in \documents and settings\\application data\microsoft\outlook\outlook.nk2 - where is the user you are logged in with. You may just want to search for .nk2.

If you were to change machines you can now of course copy this file and your autosuggest list will be re-established. Which I thought was a neat trick to know - of course I would imagine you want to make sure you are using the same versions of Outlook.

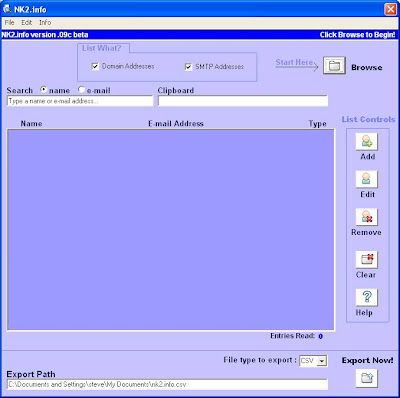
Finally, I have found an application which is still in Beta but works pretty well none the less - ah except if you have Vista it does not seem to work! Download it here at www.nk2.info - now I found I had to download the full libraries since when trying to run the lastest version on its own it was unable to find some .ocx files.


To start with just click on the browse button and it will suggest where to find the nk2 file - if this doesn't work, and I haven't had a problem just do a global search for a .nk2 file and based on the location found browse to it using the tool. When you select the file, and depending on the number of suggest entries you may have to wait a few seconds. You can now add/edit or remove items from your cache. Additionally, and this was the bit I wanted to use was the export feature - you can export to csv or tab delimited output file with all the email addresses.

I did find on a couple of machines the program crashes when you close it down but works a treat while running so far from the end of the world!

Mail on!

Monday, 10 August 2009

How do you change an Excel Row to a Column?

I can't believe how easy this actually is but until I knew I was left working out how to use formulas to do this, and you really don't need to. Initially, I was over the moon an quite proud having written a formula to do this but now I'm just red with embarassment - and as the KISS principal prevails!

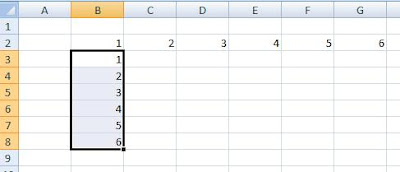
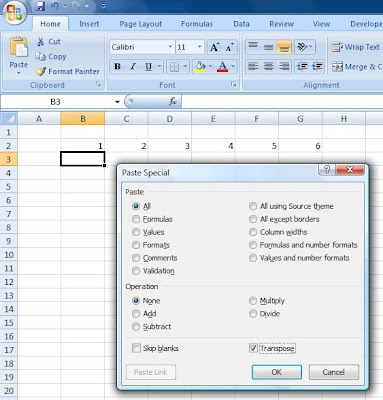
Ok, so you have a row of data that would now like to work with as column. Firstly, just select the row of data you wish to convert and edit->copy. Select the cell you want you new column of data to start and use Edit->Paste Special (Or if you are using 2007 just use the right click over the cells you are working with) and then click the transpose checkbox on. Press OK and you are away! Easy eh?!!


Thursday, 6 August 2009

How to switch on Joomla debugging... resolving problems

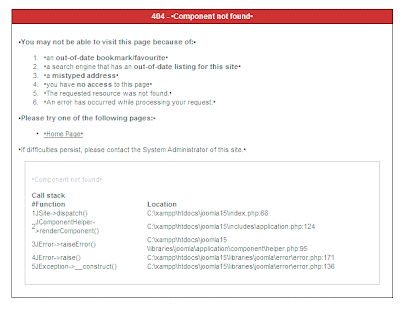
As I mentioned in my previous post I managed to get to a situation where every time I loaded the home page it loaded a 404 error. Now trying to search the web for a solution for a Joomla 404 error, as you can imagine results in a couple of pages!!

So I spotted by chance the debug option in Site->Global Configuration->System


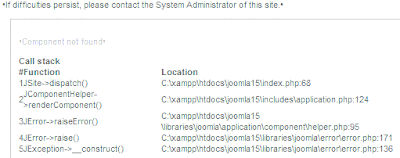
Now if you switch the debug system on and apply changes you will notice all further interaction with Joomla will result in a load of debug information being displayed. All well and good! So now this information is showing I reloaded my home page and the resulting 404 error includes some debug information - hurrah!


So finally, armed with this new information I could see prior to the JError->raiseError() call, a call to JComponentHelper->renderComponent() which I then Googled to find precisely why my page wasn't loading!! I'm well aware the error was a really silly mistake (a missing default menu) but had I not found this option I could have been looking around for a solution for quite a while.

How do you get rid of 404 error when viewing Joomla home page?

I'm still learning Joomla at the moment and have been making a lot of changes just to see how everything fits togther. I have though now managed to get to a position where when I try to preview the site or load the default home page I get a 404 page not found error - arrrrgggghhh.


Interestingly all the problem is the fact I do not have a default menu! Have a look at your main menu and double-check that you have a default item. Reseting solved the problem. I have since tried to replicate the problem by creating a new menu, making it the default and then trying to deleting it - and then in theory leaving me without a default menu but Joomla caught this and wouldn't allow the deletion, so I'm not sure how this happened!

Initially I tried to search for a resolution by looking for 404 errors but of course this results in millions of messages. I'm just going to post another entry relating to debuging which assisted the solution much more quickly.

Wednesday, 5 August 2009

Using the Stroke Command in Adobe Photoshop Elements

I couldn't believe when using Elements I never seemed to be able to draw a shape and just have an outline appear. The shape drawn always loads with a fill - as usual with thanks to the interweb I found some solutions - solutions since I found another problem along the way!


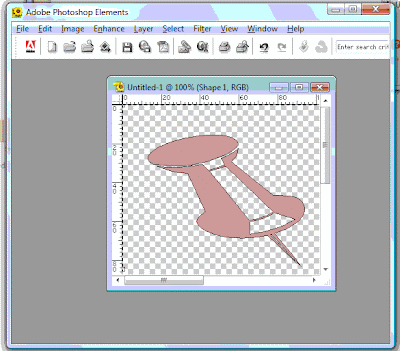
Ok so I have a filled image here - to get rid of the fill click on the shape tool again, on the tool bar select the style drop down - from the drop down click on the little double right arrows at the top right of the window that opens, select visibility and then select hide - you should then see your shape appear as an outline - at this point the shape is literally hidden, so although you can see an outline if you were to save the image there would be nothing there.


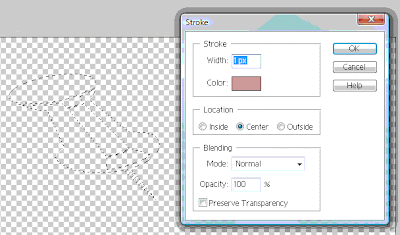
The next step is to use the stroke tool to outline the shape. This is where I initially had a problem, every time I tried to use Edit->Stroke the Stroke item was disabled/greyed out.


So.. add a new layer - you now have a shape layer and a new layer. Select the new layer, and then while holding down the control key left click on the shape thumbnail layer.


You should see your shape outline highlighted for selection. It is now possible to use the edit->stroke command.


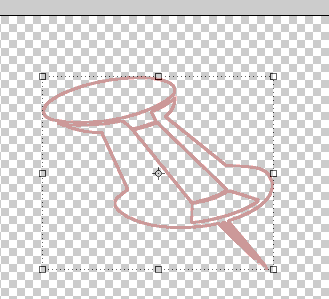
From here you select the width of the new outline you want, color, the location of the outline and blending. Press OK to go. You now have an outline on the new layer you added. You can now infact delete the shape layer and continue to work with your outline that resides on the new layer added.


How do you add items to the Joomla "Pill" menu?

I have just started playing with Joomla and as part of reading a new book on the subject wanted to add some menu items to the pill menu at the top of the screen. In truth, I had probably deleted some key elements while mucking around with the Joomla administration but none the less I had arrived at a situation where I couldn't add any items to this menu - ooops.


I have now solved it and as always with these things, it pretty straightforward:

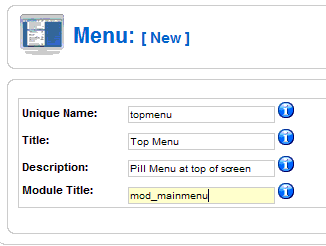
Add a new Menu via the Menus-> Menu Manager. Add your names and description, and the key thing here is to fill in the module title with mod_mainmenu.


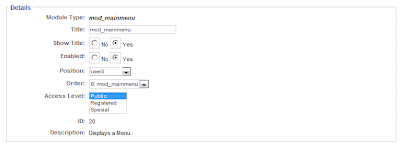
Now once done go to Extentions->Module Manager and edit the mod_mainmenu module. The key thing now is to change the position to 'user3'. Save changes and then start adding menu items to this new menu and you are away!